XGI in 1 minute 🚀
Hello! 👋
Let’s dive right in and import our XGI library. We just need to execute the following code snippet:
[1]:
import xgi
Now we’re ready to start using XGI!
Creating a Hypergraph
You have the flexibility to create a hypergraph from various data structures. One of the simplest ways is by using a list of hyperedges. Check out this code snippet:
[2]:
hyperedges = [[1, 2, 3], [3, 4], [4, 5, 6, 7]]
H = xgi.Hypergraph(hyperedges)
Adding Nodes and Hyperedges
Once you have a hypergraph, you can start adding single nodes and hyperedges using these convenient functions:
[3]:
H.add_node(8)
H.add_edge([7, 8])
If you want to add multiple nodes or hyperedges at once, XGI has got you covered:
[4]:
H.add_nodes_from([9, 10])
H.add_edges_from([[1, 10], [8, 9, 10]])
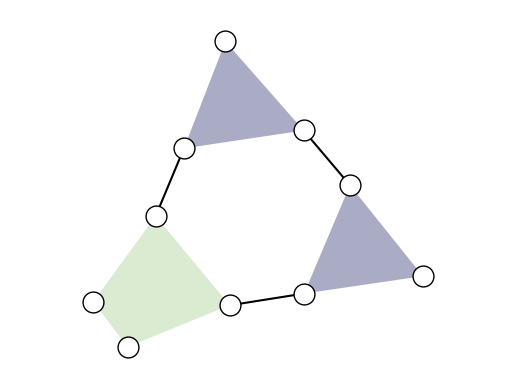
Visualizing Your Hypergraph
Visualization is key to understanding complex data structures. With XGI, you can effortlessly plot your hypergraph using the default drawing setup:
[5]:
xgi.draw(H);
For more options, explore the focus tutorial on plotting or consult the documentation!
Exploring Hypergraph Details
XGI provides handy functions to gain insights into your hypergraph. For a quick summary, simply print the hypergraph:
[6]:
print(H)
Unnamed Hypergraph with 10 nodes and 6 hyperedges
You can also access the number of nodes and hyperedges easily:
[7]:
print(H.num_nodes)
print(H.num_edges)
10
6
And if you’re curious about all the hyperedges in your hypergraph, you can retrieve them as a list:
[8]:
H.edges.members()
[8]:
[{1, 2, 3}, {3, 4}, {4, 5, 6, 7}, {7, 8}, {1, 10}, {8, 9, 10}]
Wrapping Up
Time flies! Don’t forget to check out tutorials here! And guess what? XGI doesn’t stop at hypergraphs — it can handle simplicial complexes and directed hypergraphs too!