Statistics
You may have noticed that most of the functionality in the Hypergraph and SimplicialComplex classes takes care of modifying the unerlying structure of the network, and that these classes provide very limited functionality to compute statistics (a.k.a. measures) from the network. This is done via the stats package, explored here.
The stats package is one of the features that sets xgi apart from other libraries. It provides a common interface to all statistics that can be computed from a network, its nodes, or edges.
Introduction to Stat objects
Consider the degree of the nodes of a network H. After computing the values of the degrees, one may wish to store them in a dict, a list, an array, a dataframe, etc. Through the stats package, xgi provides a simple interface that seamlessly allows for this type conversion. This is done via the NodeStat class.
[1]:
import xgi

H = xgi.Hypergraph([[1, 2, 3], [2, 3, 4, 5], [3, 4, 5]])
H.nodes.degree
[1]:
NodeStat('degree')
This NodeStat object is essentially a wrapper over a function that computes the degrees of all nodes. One of the main features of NodeStat objects is lazy evaluation: H.nodes.degree will not compute the degrees of nodes until a specific output format is requested.
[2]:
H.nodes.degree.asdict()
[2]:
{1: 1, 2: 2, 3: 3, 4: 2, 5: 2}
[3]:
H.nodes.degree.aslist()
[3]:
[1, 2, 3, 2, 2]
[4]:
H.nodes.degree.asnumpy()
[4]:
array([1, 2, 3, 2, 2])
To compute the degrees of a subset of the nodes, call degree from a smaller NodeView.
[5]:
H.nodes([3, 4, 5]).degree.asdict()
[5]:
{3: 3, 4: 2, 5: 2}
Alternatively, to compute the degree of a single node, use square brackets.
[6]:
H.nodes.degree[4]
[6]:
2
Make sure the accessed node is in the underlying view.
[7]:
# This will raise an exception
# because node 4 is not in the view [1, 2, 3]
#
# H.nodes([1, 2, 3]).degree[4]
#
args and kwargs may be passed to NodeStat objects, which will be stored and used when the evaluation finally takes place. For example, use the order keyword of degree to count only those edges of the specified order.
[8]:
H.nodes.degree(order=3)
[8]:
NodeStat('degree', kwargs={'order': 3})
[9]:
H.nodes.degree(order=3).aslist()
[9]:
[0, 1, 1, 1, 1]
The stats package provides some convenience functions for numerical operations.
[10]:
H.nodes.degree.max(), H.nodes.degree.min()
[10]:
(3, 1)
[11]:
import numpy as np

st = H.nodes([1, 2, 3]).degree(order=3)
np.round([st.max(), st.min(), st.mean(), st.median(), st.var(), st.std()], 3)
[11]:
array([1. , 0. , 0.667, 1. , 0.222, 0.471])
As a convenience, each node statistic may also be accessed directly through the network itself.
[12]:
H.degree()
[12]:
{1: 1, 2: 2, 3: 3, 4: 2, 5: 2}
Note however that H.degree is a method that simply returns a dict, not a NodeStat object and thus does not support the features discussed above.
Node attributes
Node attributes can be conceived of as a node-object mapping and thus they can also be accessed using the NodeStat interface and all its funcitonality.
[13]:
H.add_nodes_from(
    [
        (1, {"color": "red", "name": "horse"}),
        (2, {"color": "blue", "name": "pony"}),
        (3, {"color": "yellow", "name": "zebra"}),
        (4, {"color": "red", "name": "orangutan", "age": 20}),
        (5, {"color": "blue", "name": "fish", "age": 2}),
    ]
)
Access all attributes of all nodes by specifying a return type.
[14]:
H.nodes.attrs.asdict()
[14]:
{1: {'color': 'red', 'name': 'horse'},
 2: {'color': 'blue', 'name': 'pony'},
 3: {'color': 'yellow', 'name': 'zebra'},
 4: {'color': 'red', 'name': 'orangutan', 'age': 20},
 5: {'color': 'blue', 'name': 'fish', 'age': 2}}
Access all attributes of a single node by using square brackets.
[15]:
H.nodes.attrs[1]
[15]:
{'color': 'red', 'name': 'horse'}
Access a single attribute of all nodes by specifying a return type.
[16]:
H.nodes.attrs("color").aslist()
[16]:
['red', 'blue', 'yellow', 'red', 'blue']
If a node does not have the specified attribute, None will be used.
[17]:
H.nodes.attrs("age").asdict()
[17]:
{1: None, 2: None, 3: None, 4: 20, 5: 2}
Use the missing keyword argument to change the imputed value.
[18]:
H.nodes.attrs("age", missing=100).asdict()
[18]:
{1: 100, 2: 100, 3: 100, 4: 20, 5: 2}
Filtering
NodeView objects are aware of existing NodeStat objects via the filterby method.
[19]:
H.degree()
[19]:
{1: 1, 2: 2, 3: 3, 4: 2, 5: 2}
[20]:
H.nodes.filterby("degree", 2) # apply the filter to all nodes
[20]:
NodeView((2, 4, 5))
[21]:
H.nodes([1, 2, 3]).filterby(
    "degree", 2
)  # apply the filter only to the subset of nodes [1, 2, 3]
[21]:
NodeView((2,))
Nodes can be filtered by attribute via the filterby_attr method.
[22]:
H.nodes.filterby_attr("color", "red")
[22]:
NodeView((1, 4))
Since filterby* methods return a NodeView object, multiple filters can be chained, as well as other NodeStat calls. The following call computes the local clustering coefficient of those nodes with degree equal to 2 and “color” attribute equal to “blue”, and outputs the result as a dict.
[23]:
(
    H.nodes.filterby("degree", 2)
    .filterby_attr("color", "blue")
    .clustering_coefficient.asdict()
)
[23]:
{2: 0.6666666666666666, 5: 1.0}
For example, here is how to access the nodes with maximum degree.
[24]:
H.nodes.filterby("degree", H.nodes.degree.max())
[24]:
NodeView((3,))
Set operations
Another way of chaining multiple results of filterby* methods is by using set operations. Indeed, chaining two filters is the same as intersecting the results of two separate calls:
[25]:
print(H.nodes.filterby("degree", 2).filterby_attr("color", "blue"))
print(H.nodes.filterby("degree", 2) & H.nodes.filterby_attr("color", "blue"))
[2, 5]
[2, 5]
Other set operations are also supported.
[26]:
nodes1 = H.nodes.filterby("degree", 2)
nodes2 = H.nodes.filterby_attr("color", "blue")
print(f"nodes1 - nodes2 = {nodes1 - nodes2}")
print(f"nodes2 - nodes1 = {nodes2 - nodes1}")
print(f"nodes1 & nodes2 = {nodes1 & nodes2}")
print(f"nodes1 | nodes2 = {nodes1 | nodes2}")
print(f"nodes1 ^ nodes2 = {nodes1 ^ nodes2}")
nodes1 - nodes2 = [4]
nodes2 - nodes1 = []
nodes1 & nodes2 = [2, 5]
nodes1 | nodes2 = [2, 4, 5]
nodes1 ^ nodes2 = [4]
Multiple statistics
One can obtain multiple node statistics at the same time via the multi method, which returns MultiNodeStat objects.
[27]:
H.nodes.multi(["degree", "clustering_coefficient"])
[27]:
MultiNodeStat(degree, clustering_coefficient)
Objects of class MultiNodeStat also support lazy evaluation and type conversion.
[28]:
H.nodes.multi(["degree", "clustering_coefficient"]).asdict()
[28]:
{1: {'degree': 1, 'clustering_coefficient': 1.0},
 2: {'degree': 2, 'clustering_coefficient': 0.6666666666666666},
 3: {'degree': 3, 'clustering_coefficient': 0.6666666666666666},
 4: {'degree': 2, 'clustering_coefficient': 1.0},
 5: {'degree': 2, 'clustering_coefficient': 1.0}}
There are more options for the output type of a MultiNodeStat object.
[29]:
ms = H.nodes.multi(["degree", "clustering_coefficient"])

from pprint import pprint

print("# dict of dicts, nodes first:")
pprint(ms.asdict())
print()
print("# dict of dicts, stats first:")
pprint(ms.asdict(transpose=True))
print()
print("# dict of lists:")
pprint(ms.asdict(list))
print()
print("# list of lists, nodes first:")
pprint(ms.aslist())
print()
print("# list of lists, stats first:")
pprint(ms.aslist(transpose=True))
print()
print("# list of dicts:")
pprint(ms.aslist(dict))
# dict of dicts, nodes first:
{1: {'clustering_coefficient': 1.0, 'degree': 1},
 2: {'clustering_coefficient': 0.6666666666666666, 'degree': 2},
 3: {'clustering_coefficient': 0.6666666666666666, 'degree': 3},
 4: {'clustering_coefficient': 1.0, 'degree': 2},
 5: {'clustering_coefficient': 1.0, 'degree': 2}}

# dict of dicts, stats first:
{'clustering_coefficient': {1: 1.0,
                            2: 0.6666666666666666,
                            3: 0.6666666666666666,
                            4: 1.0,
                            5: 1.0},
 'degree': {1: 1, 2: 2, 3: 3, 4: 2, 5: 2}}

# dict of lists:
{1: [1, 1.0],
 2: [2, 0.6666666666666666],
 3: [3, 0.6666666666666666],
 4: [2, 1.0],
 5: [2, 1.0]}

# list of lists, nodes first:
[[1, 1.0], [2, 0.6666666666666666], [3, 0.6666666666666666], [2, 1.0], [2, 1.0]]

# list of lists, stats first:
[[1, 2, 3, 2, 2], [1.0, 0.6666666666666666, 0.6666666666666666, 1.0, 1.0]]

# list of dicts:
[{'clustering_coefficient': 1.0, 'degree': 1},
 {'clustering_coefficient': 0.6666666666666666, 'degree': 2},
 {'clustering_coefficient': 0.6666666666666666, 'degree': 3},
 {'clustering_coefficient': 1.0, 'degree': 2},
 {'clustering_coefficient': 1.0, 'degree': 2}]
Multiple statistics: dataframes
MultiNodeStat objects can immediately be output as a Pandas dataframe.
[30]:
df = H.nodes.multi(["degree", "clustering_coefficient"]).aspandas()
df
[30]:
| degree | clustering_coefficient | |
|---|---|---|
| 1 | 1 | 1.000000 |
| 2 | 2 | 0.666667 |
| 3 | 3 | 0.666667 |
| 4 | 2 | 1.000000 |
| 5 | 2 | 1.000000 |
For example, it is now easy to get the per-degree average local clustering coefficient.
[31]:
df.groupby("degree").agg("mean")
[31]:
| clustering_coefficient | |
|---|---|
| degree | |
| 1 | 1.000000 |
| 2 | 0.888889 |
| 3 | 0.666667 |
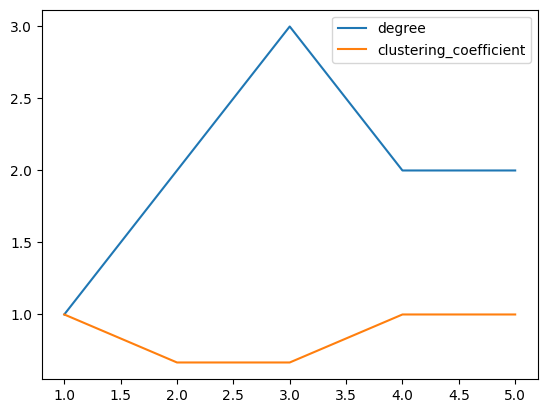
One may also immediately plot any statistics.
[32]:
H.nodes.multi(["degree", "clustering_coefficient"]).aspandas().plot();
The multi method also accepts NodeStat objects, useful when passing arguments to each NodeStat, or when requesting attributes.
[33]:
H.nodes.multi(["degree", H.nodes.degree(order=3), H.nodes.attrs("color")]).aspandas()
[33]:
| degree | degree(order=3) | attrs(color) | |
|---|---|---|---|
| 1 | 1 | 0 | red |
| 2 | 2 | 1 | blue |
| 3 | 3 | 1 | yellow |
| 4 | 2 | 1 | red |
| 5 | 2 | 1 | blue |
Edge statistics
Every feature showcased above (lazy evaluation, type conversion, filtering, set operations, and multi objects) is supported for edge-quantity or edge-attribute mappings, via EdgeStat objects.
[34]:
H.edges.order
[34]:
EdgeStat('order')
[35]:
H.edges.order.asdict()
[35]:
{0: 2, 1: 3, 2: 2}
[36]:
H.edges.filterby("order", 3)
[36]:
EdgeView((1,))
[37]:
H.edges.multi(["order", "size"]).aspandas()
[37]:
| order | size | |
|---|---|---|
| 0 | 2 | 3 |
| 1 | 3 | 4 |
| 2 | 2 | 3 |
User-defined statistics
Suppose during the course of your research you come up with a new node-level statistic. For the purpose of this tutorial, we are going to define a statistic called user_degree. The user_degree of a node is simply its standard degree times 10.
Since this is also a node-quantity mapping, we would like to give it the same interface as degree and all the other NodeStats. The stats package provides a simple way to do this. Simply use the nodestat_func decorator.
[38]:
@xgi.nodestat_func
def user_degree(net, bunch):
    """The user degree of a bunch of nodes in net."""
    return {n: 10 * net.degree(n) for n in bunch}
Now user_degree is a valid stat that can be computed on any hypergraph:
[39]:
H.nodes.user_degree.asdict()
[39]:
{1: 10, 2: 20, 3: 30, 4: 20, 5: 20}
Every single feature showcased above is available for use with user_degree, including filtering nodes and multi stats objects.
[40]:
H.nodes.filterby("user_degree", 20)
[40]:
NodeView((2, 4, 5))
[41]:
H.nodes.multi(["degree", "user_degree"]).aspandas()
[41]:
| degree | user_degree | |
|---|---|---|
| 1 | 1 | 10 |
| 2 | 2 | 20 |
| 3 | 3 | 30 |
| 4 | 2 | 20 |
| 5 | 2 | 20 |
The @xgi.nodestat_func decorator works on any function or callable that admits two parameters: net and bunch, where net is the network and bunch is an iterable of nodes in net. Additionally, the function must return a dictionary with pairs of the form node: value, where node is an element of bunch. The library will take care of type conversions, but the output value of this function must always be a dict.
User-defined edge statistics can similarly be defined using the @xgi.edgestat decorator.
[ ]: